You know the vibe. It was 2004. Low-rise jeans were the only thing in your closet, and a tribal butterfly or a spindly vine across your lower back seemed like the peak of sophistication. Fast forward twenty years. Styles change. Skin stretches. Maybe that ink doesn't quite match the person you are today. Honestly, the term "tramp stamp" is pretty dated and judgmental, but the desire to transform that specific piece of real estate is more popular than ever. If you're looking for creative tramp stamp cover ups, you aren't just looking for a new tattoo; you're looking for a tactical solution to a technical problem.
Lower back tattoos are tricky.
The skin there moves a lot. It’s a wide, flat canvas that tapers toward the spine, making placement sensitive. Most people think they just need "something bigger" to hide the old ink. That’s a mistake. You don't just need bigger; you need smarter. Cover-up artistry is basically a game of visual physics and color theory. You have to trick the eye into seeing the new depth while completely ignoring the old lines lurking underneath.
Why Some Cover Ups Fail (and How to Avoid It)
Most botched cover-ups happen because the wearer is impatient. You can't just slap a light-colored portrait over a black tribal sun and expect it to work. Dark ink is stubborn. It’s like trying to paint a white wall over a black Sharpie doodle—the ghost of the old drawing will almost always bleed through once the new ink settles and heals.
Professional artists, like the renowned Kelly Doty or the geometric specialists at Bang Bang in NYC, often suggest a "blast over" or a multi-session approach. Sometimes, you might even need a few rounds of laser tattoo removal first. I know, laser sucks. It’s expensive and feels like being snapped with a hot rubber band repeatedly. But lightening that old, saturated black ink by even 30% opens up a world of possibilities for your new design. Without it, you’re basically limited to very dark, very dense imagery. Think heavy florals, neo-traditional panthers, or deep space scenes.
The Power of Texture and Organic Flow
When we talk about creative tramp stamp cover ups, we’re talking about movement. Tribal tattoos—the most common culprit for lower back regret—are defined by sharp, stagnant points. To hide those, you need something organic.
Nature is your best friend here.
Florals with Depth
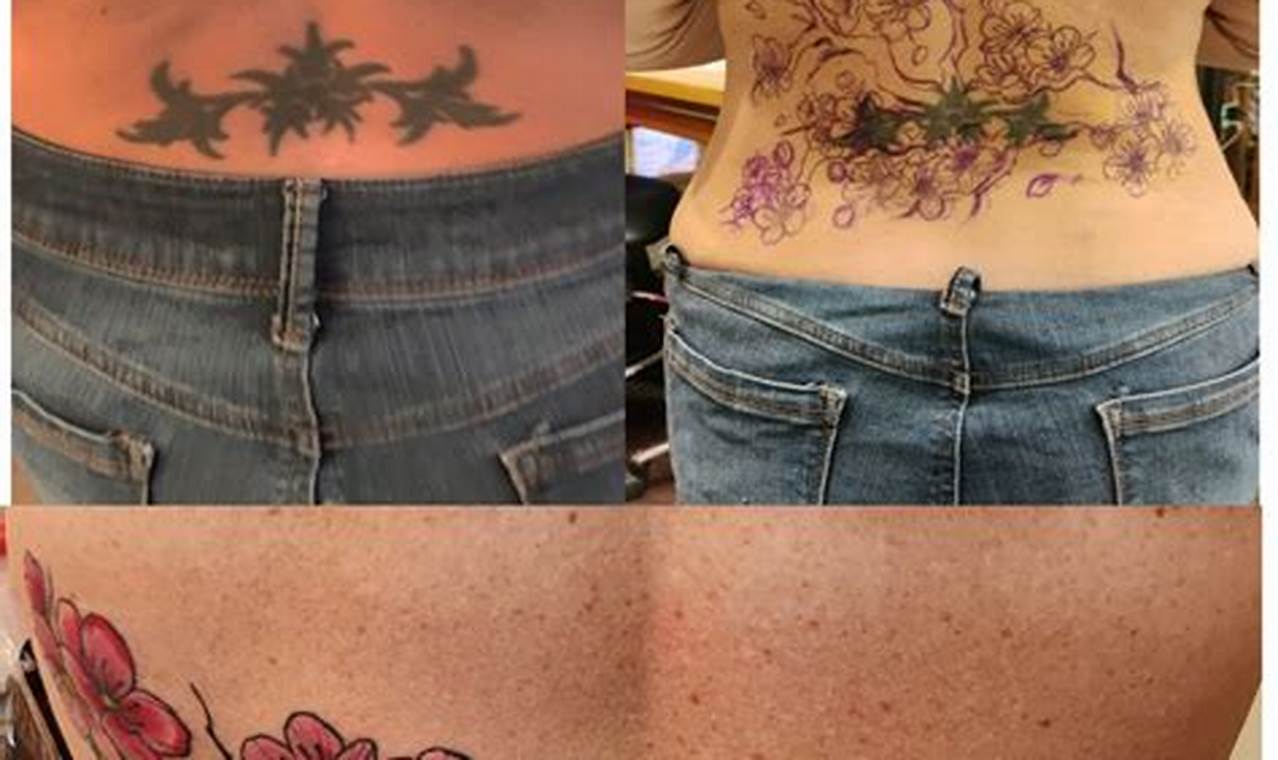
Peonies and chrysanthemums are the GOATs of the cover-up world. Why? Because they have a million petals. Each petal creates a new "edge" and a pocket of shadow. An artist can strategically place the darkest shadows of the flower directly over the thickest lines of your old tattoo. By the time they add highlights and mid-tones, your old butterfly is effectively buried in the "depth" of the bouquet.
Geometric and Ornamental Transitions
Maybe flowers aren't your thing. If you want something cleaner, ornamental "Mandala" style pieces are incredible for the lower back. They follow the natural curve of the hips. Instead of just a flat image, a skilled artist can use stippling—tiny dots—to create a gradient. This allows the new tattoo to breathe. It doesn't look like a giant black "patch" meant to hide something; it looks like a deliberate piece of body art that was always meant to be there.
The "V-Shape" Strategy
The lower back is wider at the top and narrower at the bottom. A lot of old-school tattoos ignored this, sitting like a rectangular bar across the sacrum. Great creative tramp stamp cover ups utilize a V-shape or an inverted triangle. This draws the eye upward and outward toward the waist, which is generally more flattering. Think of a bird with its wings spread or a landscape that wraps slightly around the hips.
Real Talk About Color Theory
You can't use yellow to cover black. You just can't.
In the world of tattooing, the new ink sits in the same layer of skin (the dermis) as the old ink. They essentially mix. If you put blue over yellow, you get green. If you put anything light over black, you get a muddy mess. This is why most successful creative tramp stamp cover ups rely on cool tones—deep blues, purples, and forest greens. These colors are dense enough to "hold" the old pigment down.
If you’re dead set on a color-heavy piece, ask your artist about "layering." This involves tattooing a base layer of color, letting it heal for eight weeks, and then going over it again. It builds up the opacity. It’s a marathon, not a sprint.
Choosing the Right Artist
Not every tattooer is a cover-up artist. It is a specific sub-discipline. Some guys are amazing at fine-line script but couldn't hide a freckle if they tried. Look for portfolios that specifically show "Before and After" shots.
Check for these red flags:
- The "After" photo is taken while the skin is still red and swollen (redness hides old ink temporarily).
- The new design is just a giant, solid black box.
- The artist doesn't mention the possibility of the old tattoo "ghosting" through later.
A real pro will be honest with you. They might tell you that your dream of a pale pink watercolor rose is impossible over your 1998 barbed wire. Listen to them. They aren't being difficult; they're saving you from a $500 mistake that looks worse than the original.
Beyond the Basics: Unusual Ideas
If you want to move away from the "floral or bust" mentality, consider these:
- Biomechanical or Bio-organic: These styles use "mechanical" or "alien-like" textures. Because they are so busy and detailed, they can hide almost anything. The chaotic lines of "cables" or "veins" make old tribal lines disappear into the background noise.
- Illustrative Woodcut: This style uses heavy black line work and hatching, similar to old book engravings. It’s sophisticated, timeless, and provides excellent coverage because of the high-contrast black ink.
- Japanese Traditional (Irezumi): Think finger waves, clouds, and dragons. The "background" of these tattoos (the black and grey clouds or water) is specifically designed to cover large areas of skin solidly.
Maintenance and the "Settling" Period
Once you get your cover-up, the game isn't over. As the skin heals, your immune system actually tries to "clean up" the new ink. During this process, the old tattoo can sometimes start to peek through. This is totally normal. Most high-end cover-up artists will schedule a "touch-up" session about three months after the initial piece is done. This "second pass" is where the magic happens—it’s where the final layers of saturation are added to ensure the old piece is gone for good.
Don't skip the sunscreen either. UV rays break down tattoo pigment. If your new cover-up fades, the old, deeper-set ink might become visible again. Keep that lower back protected if you're hitting the beach.
Actionable Next Steps for Your Cover-Up Journey
If you're ready to move on from your old ink, don't just walk into the first shop you see. Start by taking a clear, well-lit photo of your current tattoo. Research artists within a 100-mile radius who specialize specifically in "reclamation" or "cover-up" work—check Instagram tags like #coveruptattoo or #tattoorepair. Book a formal consultation rather than a tattoo appointment. During this meeting, be open to the artist's suggestions regarding size and color; remember that a successful cover-up usually needs to be at least 2 to 3 times larger than the original piece to properly distract the eye. If the artist suggests laser sessions first, take their advice—it is the difference between a "decent" cover-up and a masterpiece that looks like original skin.